Pumpkin Banana Smoothie

I’ve been using my Magic Bullet blender a lot lately. The amount of times I’ve used it in just the past month is far more than in the previous years combined. It’s been nothing but smoothies all around, so when I saw this Pumpkin Smoothie on another blog (JK: The New Me) I thought I’d give it a try.

IMG_0295

I had some leftover pumpkin from my Pumpkin Pecan cupcakes, so this was the perfect occasion. I usually enjoy a smoothie for breakfast or lunch with a little something light, but these are pretty good whenever you’re in the mood for a little something healthy, yet sweet. Enjoy.

  • 1 whole ripened medium sized banana
  • 1/3 of a cup of pumpkin puree
  • 1 cup of almond milk
  • 1/3 cup of vanilla yogurt or Greek yogurt, take your pick
  • 1 teaspoon vanilla extract
  • 1 teaspoon cinnamon
  • 1 tablespoon cocoa powder
  • 3-5 ice cubes

IMG_0294

Your concoction may look like the one above. Now watch it blend. Give it a sip. It’s tasty, right? It’s not overly sweet because there’s no added sugar. Just whatever naturally occurs in the main ingredients.

I’d never had almond milk before. It’s really tasty. Also, true story, I spilled it twice trying to make this smoothie, dropped the box two times, I’m not clumsy at all, but it was 8 am. I really needed this to get my morning off to a good start. Wake and shake. Yup.

Another thing, I’ve bought Greek yogurt before and did not like it at all, so I settled for regular old vanilla yogurt. I didn’t want to get stuck with a small tub of yogurt that no one in the house would touch. At least with this I can still toss in a little pecan granola cereal and enjoy a late night snack.

You know what? Drinks are hard to make look good in photographs. Ah well. Hey, let me know what you think of this. Want to see the other smoothie concoctions I make myself for breakfast? I’ll share if you do, heck, even if you don’t I’ll share.

Pumpkin and Pecan Cupcakes With Brown Butter Icing

While at work yesterday, someone suddenly got a craving for Sprinkles cupcakes and made the mistake of bringing it up to everyone. That’s when I knew what I’d be up to today…cupcakes! I remembered that I had just picked up a can of pumpkin, which I had intended to use in a pumpkin shake (I’ll probably be posting about that very soon), which would make for great cupcakes. I had also recently made a trip to Costco, where I nabbed a rather large bag of pecan halves, so I’ve got everything I need to make a delicious cupcake. Plus, there’s a little bonus if you want something extra in the form of white chocolate chips.

Before I get into the recipe I would like to cover one educational thing because I was asked this over the weekend by the cupcake hungry coworker, but on Saturday. The topic is pumpkin, she asked me what the difference was between pumpkin puree and pumpkin pie filling. Pumpkin pie filling is already spiced and is almost ready to go for a pie, whereas pumpkin puree is nothing but pumpkin. The labels are a little tricky because they may both say 100% pumpkin, but if in doubt look at the ingredients and you’ll see for pumpkin puree there is just one, I’ll let you guess at what that lone ingredient may be. With pumpkin pie filling you’ll see a longer list of ingredients. Now you know.

IMG_0281

Now on to the thing you care about a recipe for delicious pumpkin cupcakes with pecans and/or white chocolate chips with brown butter icing. The two recipes were adapted/lifted from Brown Eyed Baker (the cupcakes) and Martha Stewart (the icing). Here’s what you need:

IMG_0272

Pumpkin Cupcakes with Pecans

Makes approximately 32 cupcakes

  • 4 cups of cake flour sifted
  • 1 teaspoon of baking soda
  • 1 tablespoon + 1 teaspoon of baking powder
  • 1 teaspoon of salt
  • 2 teaspoons of ground cinnamon
  • 1 tablespoon of ground ginger
  • 1 teaspoon of ground nutmeg
  • 1 teaspoon pumpkin pie spice
  • 1/4 teaspoon of ground cloves
  • 1 cup of unsalted butter, room temperature
  • 2 1/2 cups packed light-brown sugar
  • 4 large eggs
  • 1 cup of buttermilk
  • 1 1/2 cups of canned pumpkin puree
  • 1 1/2 cups of pecan pieces
  • 1 cup of white chocolate chips or regular chocolate chips (optional)

**Note that in my Kitchen Aid stand mixer everything goes nearly to the top of the beater blade. Not sure if mine is 4.5 quarts or 5 quarts, but be wary if using something smaller if something smaller exists.

1. Preheat oven to 350 degrees. Place cupcake liners in muffin tins.

2. Sift your flour and add baking powder, baking soda, salt and spices.

3. Cream together brown sugar and butter until fluffy.

4. Add eggs, one at a time and beat thoroughly into mixture. IMG_0273

5. Add flour in three parts, alternating with 1/2 of buttermilk. Mix well.

6. Add pumpkin. Mix well. IMG_0274

7. Add pecans and/or chocolate/white chocolate chips. Mix.

What I did was make half of my batter with only pecans and with the remaining batter I added the chocolate chips, both chocolate and white chocolate.

IMG_0276

8. Fill liners about 3/4 to the top. I used my Oxo Medium sized cookie scoop; two scoops was perfect and made for some very uniform cupcakes.

9. Bake for 15-18 minutes at 350 degrees, rotating two tins midway through baking.

IMG_0277

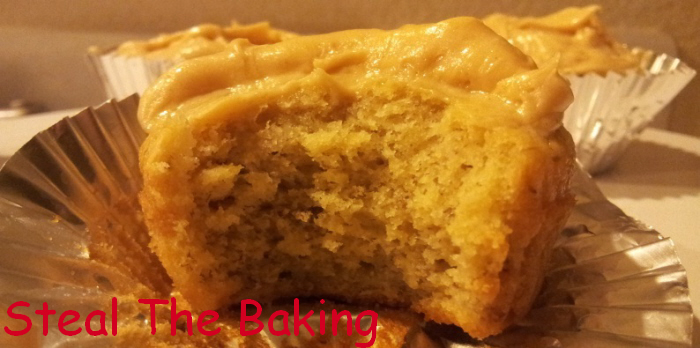
Get up close and personal with this pumpkin and pecan cupcake.

IMG_0280

Want to top it with something a little different? How about this very simple brown butter icing?:

Brown Butter Icing

  • 4 tablespoons of unsalted butter
  • 1 cup of sifted powdered sugar
  • 1 teaspoon of vanilla extract
  • 1-2 tablespoons of milk

1. Grab a small saucepan and toss in your butter. Heat on medium high heat until you get a nutty brown color. The whole process takes about ten minutes or so. Remove from heat and pour into a bowl.

2. Add sugar, vanilla and one tablespoon of milk, stir until smooth. If your icing is too think add in remainder of milk a little bit at a time until you reach a spreadable consistency. Allow five minutes to cool

I think mine was a little too runny, but I spooned it over my cupcakes anyway. Or at least over a good portion of them. The recipe may not cover all 32 of your cupcakes, but there’s always a few people who prefer them un-iced, de-iced, without icing.

IMG_0282

I picked this recipe mainly because of the sheer amount of cupcakes it yielded. Many of the other recipes would only net me a dozen cupcakes, which wasn’t going to cut it for me. I’ve got to share these with friends and family. For the record, they were well received. I hope you dig these. Let me know if you do. I like the comments, they’re so few and far between.

IMG_0283

IMG_0293

Okay, normally I write something about what I learned, but I don’t really have much to share this time. They’re cupcakes and they came out well, with the exception of the brown butter icing, which wasn’t bad, just a little runnier than I hoped. I probably could have fixed it with more powdered sugar, but there’s enough sugar in these bad boys, right? Do we really need more? I says no. Anyway, let me know what you think of these and how you might improve on them or make them differently. Until next time.

–B.

Pink Lemonade Cake With Lemonade Buttercream Icing

While at work the other day I saw an old Better Homes & Gardens from May 2012 laying around and decided to thumb through it. In it I found a recipe for the titular cake and instantly knew that it was what I wanted to make this week. And that’s exactly what I did. I wish there was a more interesting story behind this, but alas, there’s not. So, earlier in the day I hit the store (actually two because the first store I went to didn’t have lemon extract nor Marshmallow crème) to get everything that I needed for this very pink cake.

IMG_0260

For the record, this was a straight copy of the recipe by Karen Tack, with the exception of the icing because I just halved what was called for since I didn’t need to ice three cakes.

You can see the cake I tried to make on BHG.com, though in order to see the entire recipe, I believe you need to become a member. Either way, I’ll detail my pseudo variation of it below.

Pink Lemonade Cake

  • 1 cup butter, softened
  • 4 eggs (room temperature for 30 minutes)
  • 3 1/3 cups all-purpose flour
  • 1 tablespoon baking powder
  • 1/2 teaspoon salt
  • 2 cups sugar
  • red food coloring
  • 1 1/3 cups of milk
  • 1/4 cup frozen lemonade concentrate, thawed
  • 1 teaspoon pure lemon extract

IMG_0240

1. Preheat oven to 350 degrees. Line a pair of nine inch round cake pans with parchment paper (also known as baking paper) and grease them up. Lightly flour the pans, to make it easier to remove cakes.

2. In a medium size bowl stir together flour, baking powder, and salt. Set those aside.

3. Cream your butter using a mixer. Add sugar 1/4 cup at a time. Add 1/8 of a teaspoon to butter mix, I used about 15 drops or so, to make a pink colored batter. Add eggs, one at a time, mixing  well after each one is added. You should get a pretty in pink batter that looks something like this:

IMG_0246

4. In another bowl mix your lemonade concentrate, milk, and lemon extract. Alternate adding lemonade and flour mixtures into butter mixture. Mixing well.

5. Remove half of cake batter (4 cups) and put into cake pan. With remaining mixture add red food coloring until you get a color that suits you, I used another 15-20 drops to get a nice dark pink batter. Pour into cake pan.

IMG_0247

6. Place in over and bake at 350 degrees for 35 minutes, or until cake tester comes out clean.

IMG_0248

Now, if you want to do what I did and complete the whole lemonade theme we’ve got going on here’s what to do for the lemonade buttercream frosting.

Lemonade Buttercream

(Half mixture, for original recipe double all ingredients.)

This half mixture is more than sufficient to ice the two layers of cakes made above.

  • 1 1/2 cups of unsalted butter, softened
  • 1 16 ounce jar of marshmallow crème, or if you’re like me and your local store doesn’t carry them that big use two of the seven ounce jars, or apparently they come in 13 ounce jars as well, that’ll probably suffice
  • 1/8 cup of frozen lemonade concentrate, thawed
  • 1/2 cup of powdered sugar
  • 1 teaspoon pure lemon extract

1. Start by beating your butter.

2. Add in marshmallow crème and lemonade concentrate, beat until smooth.

3. Mix in powdered sugar and lemon extract. Whisk until light and fluffy.

IMG_0251

4. Ice your cakes to the best of your ability. Me? This was the best I could do. Still only my third or fourth real try at icing a cake. I think I’m not making my buttercream correctly, but I don’t really know what it’s supposed to look like, so I’m out of luck there. As are the people forced to eat this thing.

IMG_0252

The two tone pink layers makes it look real pretty, though, this picture doesn’t show it off very well. Blame the flash, the picture at the top of the page displays it a little better.

IMG_0256

The cake is ok, the complaint I got was that it was too dense. I thought it was something I did, but if you refer to the picture on the BHG site, that also looks a little dense. If I could make a better spongy cake this would have been awesome. The density makes it a little hard to enjoy. Somewhere along the way I did something wrong. Ah well. Another time.

IMG_0261

What I did like was that it has a very sour flavor to it, the lemon extract gives it some pucker punch. Overall, not bad. I’d love to be able to try this again with a better cake consistency. I think it would be delightful as a summer cake when lemonade is the order of the day.

That’s all I got for you this week, I hope you enjoyed reading this and maybe if you decide to make this share what you did differently and how it came out, I’m always interested in making something better. Until next time, take care.

Pecan Tarts (or Pie) With Almond Meal Crust and Nutella Frosting

Okay, because everything has to be over the top on Steal the Baking, I’ve got to one up all the simple Pecan tart recipes on the ‘Net by using both an almond meal crust and a Nutella topping. I know what you’re saying, ‘That’s nuts!’ Indeed it is, three kinds of them, almond, hazelnut, and pecans. I would’ve stopped at the almond meal, but that’s not enough. You can leave it out if you want, but I’m going big and trying to do something you haven’t seen before. (Maybe for good reason)

IMG_0235

First we’ll start with Almond meal, it’s not necessarily the same as almond flour. This particular bag is from Trader Joe’s and apparently the difference flour is likely blanched, while meal is unblanched. That is to say that one still has the skin and the other doesn’t. So, while this one says almond meal it doesn’t mention blanched or not, but since I could see the dark from the skins, I could take a guess as to which this one is; unblanched.

I bought this almond meal a few days ago and was trying to think of something to make with it ever since. I picked the brain of a friend at work who suggested it be made into a pie crust or a crust for a torte. I love pies, but I’m not big on fruit pies, so I continued to think it over until yesterday I was at a party and heard someone mention pecan tarts and that’s when the idea struck me. Then today, I thought I’d try to truly make it my own and that’s when the Nutella idea came in. After looking at a few different recipes, I settled on two. One adapted from EightyMPHMom for the almond meal crust and the other from Food.com for the pecan pie filling. So, that’s where these two recipes come in.

Pecan Tarts With Almond Meal and Nutella Frosting


Tart Crust (Makes ~12 tarts)

  • 1 cup all-purpose flour
  • 1 cup almond meal
  • 2/3 cup shortening (I used Crisco Butter flavored)
  • 1 teaspoon salt
  • 1/4 cup water

1. Before you even begin, chill your shortening for at least an hour.

2. Put all your dry ingredients together then cut in shortening. It’ll be clumpy with no real consistency. Add in your water little by little and mix until the dough resembles something that you can work with. (Flatten it and wrap it in plastic wrap and put it in the refrigerator for about 30 minutes if you’re making a pie crust)IMG_0229

3. I placed cupcake liners in a silicone cupcake pan and flattened out a small portion to put in each liner and flattened out the edges by hand.

IMG_0231

I suppose you can make this easier, but I wanted it to look nice for once. It actually might be a little easier if you don’t use liners, but I don’t need the extra mess, so I passed on that idea.

Pecan Tart Filling

  • 3 eggs slightly beaten
  • 1 cup light corn syrup
  • 1 cup packed brown sugar
  • 1/3 cup melted butter
  • 1/3 teaspoon salt
  • 1 1/4 cup pecan (I used 1 1/2 because that was the size of the bag I had, no sense in having a 1/4 cup of pecans around)

1. Mix everything in a bowl. Including pecans.

IMG_0225

IMG_0226

2. Fill tarts 3/4 to the top (they expand a little bit).

IMG_0233

3. Bake at 350 degrees, mine took about 40 minutes before they were done.

IMG_0237

4. If desired, spread Nutella on top for added craziness. Otherwise, enjoy with vanilla ice cream or milk.

pecan tart with almond meal crust

The almond meal gives the crust a nice nutty flavor, even if it is mostly overpowered by the pecan filling. Same goes for the Nutella, it’s optional, but it’s delicious nonetheless. You’ll probably have extra filling, I wish I could give tell you an idea for what you can do with it, but I’ve got nothing. If you know of a little something, please leave it in the comments below.

What I learned from this recipe:

This is not a difficult recipe, but requires a longer than usual amount of time to complete. The downside is the recipe only yields about twelve tarts, but according to the original recipe you can just double the recipe, though you’ll then be short of pecan filling. Oh the conundrum.

Anyway, that’s all I have for you this time around. Please let me know if you give this a whirl. I don’t think you’ll be sorry for a second. You may need to stay on the treadmill an extra 20-30 minutes, but you know it’s worth it. Take care and enjoy the bakes.

Grilled Peanut Butter & Jelly Sandwich

So, a new friend of mine mentioned this to me a short time ago and I decided I’d give it a go. (Shout out to Hillary!) Rather than just keep it to myself, I figured I’d at least share the fruits of my labor. This isn’t really a recipe so much as it is just something I was messing around with. To be honest, I’m not entirely sure that I even made it right, if there is a right way to make one of these.

20120827_225950

I started out with some butter on bread, like so:

20120827_224818

I threw the bread in a skillet and gave it that nice golden brown look that you know and love from your average grilled cheese sandwich. After that I took out my peanut butter and grape jelly, I tried to make this as healthy as I could. Maybe that was my downfall.This thing is supposed to be all about guilty pleasure and indulgence.

20120827_225522

I spread the PB&J on the bread, closed up the sandwich and threw it down on the skillet for a little bit longer to heat up the filling. Removed and cut for a quick picture and then threw it down my face hole.

20120827_225816

When I heard tale of this sandwich I just knew I had to try it out. It was pretty good. I think I need to give it another go and see if I can’t make it a little better, but all in all it’s a tasty twist on a classic treat. Normally I do PB&J on a couple of Eggo waffles which is just about my most favorite thing in the world, but this was worth a go. Apparently, this is a thing in Indiana, so if you’ve ever tried this or know of a way for me to make it better I’m all ears. Take care. See you next time.

20120827_225922